Thursday, May 16, 2013

Garden Wargaming with 30mm SAE Figures

With warmer weather coming I found myself thinking about how to get more wargaming in. SomehowI just haven't had the time to get games in. On my day off by the time I run my errants, do the required work around the house and getting the dog out, the day is done  and my wife is home. Now
I always feel guilty because I don't get my dog out as much as she should. Last week as I was sitting out in the yard and Molly was enjoying the fresh air, I started thinking of playing with Airfix figures in the yard when I was a kid. With "little Wars" in mind, I was trying to figure what toy soldiers I could use. Now Airfix was fine as a kid, but even based they are still pretty tipsy. I wanted to use metal figures for their weight. While considering which scale to use, 40mm or 54mm, some SAE 30mm British Guards figures purchased several years ago caught my eye. I grabbed a few of them and brought the outside. The size of the bases seemed to work fine. But I only had 8 of the figures. I went on Ebay and found a good size lot of SAE 30mm Civil War figures at a good price.  The figures has seen many campaigns and most of the rifles are broken and some will need repairs, but for what I want them for they will do.

Today was a beautiful day and Molly was itching to get out. When I got home from work the package of figures were in the mail. I grabbed a handful of the figures, some dice and made a quick measure stick.  Using basic rules, as Molly laid in the sun, I started playing with the figures.  While it was just to see if the figures would work, I found not only did they work, but I was having more fun than I should have for the time invested in the setup.  I fought 2 skirmishes, the Union won the first; Confederates the second.  I even decided to snap a couple of shots of the action.
The Yankees manage to cut 2 Rebels off from the rest; discretion being the better part of valor, the Rebs surrender.

Friday, May 10, 2013

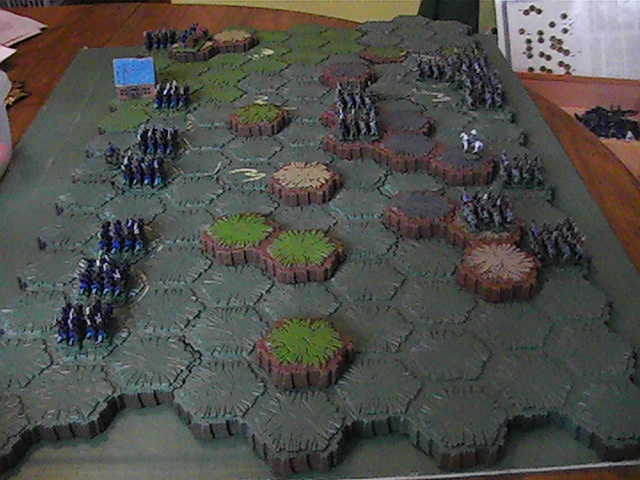
Heroscape Civil War battle with 10mm Old Glory Figures

When I first got back into wargaming and was looking for different ideas, I bought a lot of Old Glory 10mm figures. I must admit that I really like the strips of infantry. And when I bought Avalon Hill's Battle Cry game, it seemed that it might be a good match. And then Heroscape came along and it seemed perfect to use with Battle Cry.  However I've only combined them a couple of times. 
I haven't got a war-game in for a while so I decided to have a go at it. After all, for a solo war gamer Battle Cry is great as the scenarios are given with troop deployment, terrain and victory conditions spelled out for you. I decided to use Memoir of Battle by Bob Condrey for the rules. I couldn't find my rulebook for Battle Cry; however I did have an additional scenario supplement that came with the game. I used the Battle of McDowell, May 8,1862.

Part of the scenario for the Battle of Mc Dowell
The set up for the battle.  I still haven't figured out how to have woods that will work with the miniatures, so I just marked those hexes with chalk.

Wednesday, May 1, 2013

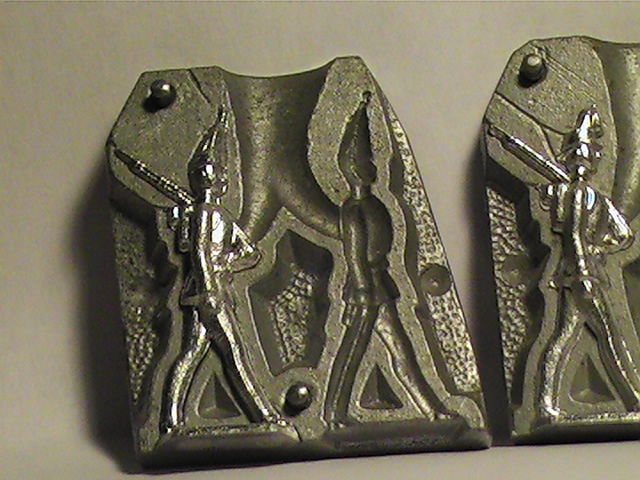
New Toy Soldier Molds

While on Ebay a couple of weeks ago, somehow I came across these molds, which were on the German Ebay site. I got these  molds; unfortunately I could only afford two of them and missed out on some more. I was hoping these would be the same size as Zinnbrigades, alas, no. However, they are nice figures and sometimes I think of maybe trying to sell toy soldiers at local craft fairs. These would be nice additions if I ever do take the plunge.

Tuesday, April 30, 2013

More Peter Laing Victorian Parade Figures

While I wasn't busy I figured I would show some more of the Peter Laing Victorian Parade figures.  Once again, not being an expert I'm guessing at the catalog numbers.

From left to right: A7005 Sapper for carrying plank.  F7047 Rifle bugler.  A7004 Sapper with shovel.


Rear view.

Monday, April 29, 2013

Another 40mm Zinnbrigade Conversion

While casting some new figures I came across the mold I made from some old heads I found in an odd-lot of toys soldiers. This head looked like a British colonial in a sun helmet. 
A previous conversion loses his head. His new head is at his feet.
The neck hole is drilled out and head fitted.

A quick coat of  paint for a rough idea of how it would look.

From another angle. The head looks a little large for the body.  Maybe a 45mm head on a 40mm body?
I like the way this figure looks. It definitely has an old toy soldier look about him. I could see him in a "Little Wars" battle.

Monday, April 22, 2013

Finishing and Casting the Peter Laing Molds

Molds after first half dried.

Preparing to pour the second half. Putting on mold release (I use plain petroleum jelly). You only have to put it on the rubber itself; the rubber will only stick to untreated rubber.

I used to pull the mold out of the frame. Now I just carefully push the mold down flat on the bottom. If there is any gaps between the mold and frame, put a bead of petroleum jelly between the mold and frame so the rubber won't seep down the sides of the mold.

Mix the rubber as before and work the rubber around the figures as before.

The molds after they have dried and been separated.

Make sure that the pouring spout is clear so the metal can get into the mold. Also make sure the air vents  are open at the top of the mold.

The molds have been prepared with talcum powder that serves as a release ( you can also use graphite). Boards are used to hold the molds together without crushing the rubber, and then clamped together. I do this as the metal melts.

Carefully pour the metal in a steady pour. Fill the mold right to the top of the pouring spout. Also, make sure the molds are dry. If there is dampness, the molten metal can be ejected out the way it came. Wear safety gloves and glasses.

After pouring the metal, tap the mold on the workbench to help get the metal  down into deepest parts of the mold (roughly about 5 seconds).

Molds after pouring. The first couple of figures might not come out. The molds have to warm up . Now's the time to look for imperfections and see how to get the molds to fill properly.

Here is a shot of the masters and home casts. As can be seen, the hussars sword didn't come out, and the flag looks like it's been through some heavy fighting. I cut a new air vent from the sword to an existing air vent, which seemed to help. The flag is still giving me problem.

Sunday, April 21, 2013

New 15mm Peter Laing Figure: Camel Archer

I recently bought a lot of figures on Ebay. There was a large lot of 1st generation of 15mm Minifigs
anicents. But I also noticed what appeared to be three Peter Laing camel archers. In the Peter Laing catalog I have they are listed as: Ancients A407 Nomadic 2 man camel archer.
15mm Peter Laing A407 Nomadic 2 man camel archer

Tuesday, April 16, 2013

More on Making Peter Laing Molds

One of my first posts I talked about making molds using Peter Laing figures. I have started a new batch of molds using some new ideas from the last batch. The first four molds seem to be a success. I don't advocate making copies when you can buy them. I would love to be able to buy Peter Laings and make molds as a last resort. I would love to see whoever owns the original molds go back into production.
First step I rolled out clay. I made 2 mold forms and pressed them in the clay so I know  where the figures will be placed. I then put the pouring cone roughly in place. Then the figure is put in. Try to imagine where the seem on the figure would be. I used some solder to make air vents. Then using  the end of a paint brush, make a couple of keys to lock the molds in place when casting.

I use Aeromarine 125 silicone rubber for my molds. It is a great product. It uses a 1 to 1 mix ratio, which is great as I am terrible at figuring out the proper measures. It  can tolerate a temperature of 500 degrees. The drawback is once it is mixed you have 15 minutes to work it. Also, once open it has a 60 day shelf life.  Still, at $5.00 a mold, it is a good buy.

For the molds I make, one tablespoon and one teaspoon of each parts is enough  to create half  a mold.


Paint a little layer over the figures and work it around the figures so as to eliminate air bubbles. 

Once satisfied that the air bubbles have been worked out, pour the rubber until the mold is filled halfway.

The molds at the halfway mark. Another good thing about this rubber is it has a quick set time. I will usually give the molds at least 8 hours to cure. Tomorrow I will try to finish them.

Monday, April 15, 2013

15mm Minifigs 1st Generation American Revolutionary War Figures


 As I've said in past posts, one of my interests is in Minifigs 15mm 1st generation Napoleonic. I also recently bought a lot of 2nd generation SYW Minifigs. In the lot was a set of 1st generation SYW artillerymen. Now I found myself interested in SYW 1st generation Minifigs!

My brother and I used to fight what we called war-games in our youth, my army was Airfix Napoleonics, his Airfix AWI.  I sometimes wished I had gone with the AWI figures; maybe it would have sparked my brother's interest in wargaming.  The period is interesting to me because you have the British army with their regimented and colorful uniforms, and the rebels, with their diverse uniforms. Also the fact that the first battles were fought in my home state makes it more interesting for me. With Charles Grant and Peter Young using the SYW as the basis for their war-games, it's a small leap to use AWI as a basis for an imaginary war.

So image my excitement when I saw a lot of 1st generation AWI on Ebay; a total of 9 different sets with over 180 figures! I won the lot and was more than excited when they came in. As my units are usually based along the line of Battle Cry; 4 men infantry units, 3 men cavalry units, and 2 gun artillery units.


T-1  British regular infantry?

T-1 close up of back of figures

T-2 British Grenadiers

T-2 British Grenadiers back

T-3 British light infantry?

 T-3 British light infantry back

T-10 British light Dragoons

T-10 British light dragoons

T-14 American light infantry

T-14 American light infantry
T-15 frontiersmen

T-15 Frontiersmen

T-17 Militia

T-17 Militia
T-18 American Light Dragoond

T-18 American Light Dragoons

T-13 Regulars

T-13 Regulars

I am no expert on Minifigs and have no access to  catalog and my descriptions is based on the uniforms. If I'm wrong with any of the above please feel free to correct me


Saturday, April 13, 2013

15mm Peter Laing Armoured Elephant & Armoured Camel Lancer

In the last post I mentioned that I had to work on my photographs. Here are some new photos of the elephant and camel from last post. What's more, I believe the Peter Laing catalog # and description
of the pieces are: A421 Armoured elephant & howdah  and A420 Armoured camel lancer.