Showing posts with label Homecasting. Show all posts

Saturday, April 9, 2022

New Homecasting

    A little over a month ago I purchased an old metal toy soldier mold. It was a three figure mold of Prussian SYW fusiliers. I have never seen this mold, but the figures were quite handsome. I placed a bid, which was successful. Unfortunately, the day it was delivered I had come down with a bad cold, which in turn became bronchitis. What's more, I became so dehydrated that my gout flared up in both my legs, leaving me barely able to walk for 3 weeks. However, the miracle of modern medicine got me back on my feet and back to work.

   My poor wife, after being my personal nurse for four weeks, was invited to a birthday party, with the added bonus that she got to get away from her problem patient. I decided to try the mold out.

    I was surprised that I got some useful figures, as the metal in the pot was low and tends to be contaminated at the end.  The figures themself seem to be about 45mm tall. If they could be molded properly they would be great figures. For me, the mold was bought a a whim and how much use it will get is anyone's guess.


The mold

The completed casting. I had a 50% success rate; although  the  the bayonets didn't come out and the pigtails broke off (due to my clumsy handling).


One of the casting compared to a Prince August 40mm grenadier. I measured the fusilier using a ruler, and it came out to roughly 45mm to where the top of his head would be.


Sunday, November 22, 2020

Homecasting Horses in 45mm

   A couple of other blogs have been working on post-ACW militia companies, an area of great interest to me. As mentioned before, anyone interested in colorful uniforms would do well to look into the militia uniforms of the militia in the United States in the 19th century. 

    I have been toying with different projects to get my interest back into gaming. One was to use Britain's West Point cadet figures to create post-ACW militia companies. Another was to make 40mm Militia units. I started by making a mold of a Britain's West Point figure; the idea is to use this figure to convert to a master that different heads could be added to.  The mold turned out usable figures; now to figure how to use them.

   I also saw at Berliner Zinnfiguren a nice horse mold in 45mm. The picture shows an elegant horse in full gallop. I ordered it, along with a Napoleonic Chasseur a Cheval figure.  I almost cancelled the order once the postage was added; however I broke down and bought the molds. 

  They came this week. As my wife was going out with a friend Saturday morning, I set up for a casting session while she was gone. I had also made a mold of a Britain's series B Guard marching figure that I wanted to test.

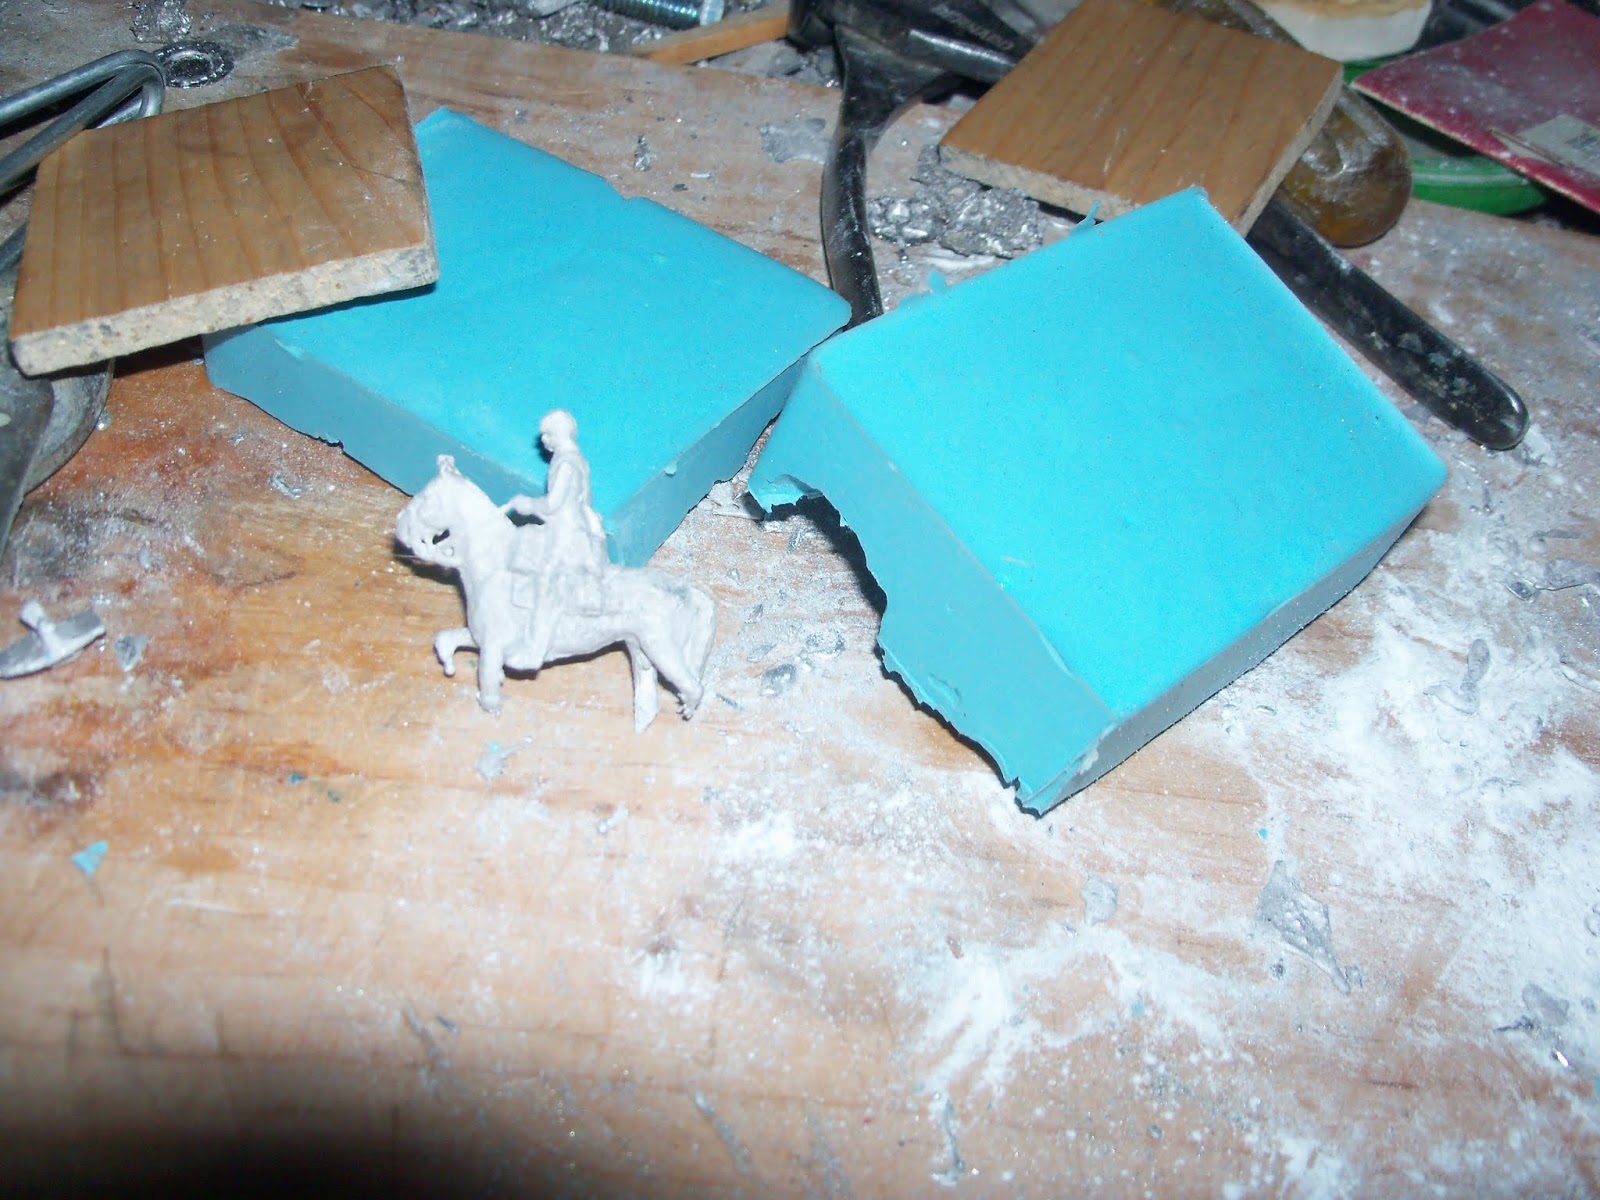
   The casting session was partially successful. My homemade mold was a failure. However, the Horse mold was a success. The horse mold, made by the company Nowikoff, is a two piece figure. What makes this mold great is the body of the horse is hollow, cutting down both weight and the amount of metal used. The mold fills well, however, being a rather thin mold, needs several clamps to keep it together without the metal oozing out. As can be seen from the photos below, the horse as cast is leaping over a bush, with a large base. I ordered it, hoping to cut the base and bush off, thereby having a horse with a classic Britain's free standing horse. Thankfully it worked as I hoped, although the legs have to be bent slightly to get them stable. Luckily the metal being used can be gently bent, so the horse is free standing. The two halves fit together well, with a few gaps that need to be filled.

  While working on the horse, another thing I wanted to see is if Zinn Brigade horsemen would work with this horse. I tried a Lancer figure on the first casting. I was very happy with the result. So happy, in fact that I cast total of 5 horses and a couple more Lancers with the idea of making a unit of Lancers. I want to paint up a unit of National Lancers, a Massachusetts Militia unit formed in the 1800's which became quite famous, and saw action in 3 wars. The National Lancers are still in existence, being a ceremonial unit in my home state.


West Point Casting

First casting of Nowikoff horse mold

Trying the horse with a Zinn Brigade Lancer. The inspiration for the National Lancers

A photo of a just poured horse. I believe more metal goes back into the pot that goes to the horse itself. I cut off the bush and base and return those to the pot.

Working on cleaning up the castings.

The horses have been glued together and primed for painting. I started painting one of the horses to see how glossy the glossy paint I am using was going to be. I really want these figures to look like proper "Toy Soldiers".


Thursday, June 6, 2019

Wargame News; First the Good News...

   BORE WAR-NING!  Before going on vacation, I had ordered two Airfix molds from Germany; copies of old Schnieder cavalryman and horse molds. I also found Frying Pan and Blanket Amalgamated's address and sent for a list of their figures, and found on Ebay of 54 old Wargamer's Digest that I bought.

   The molds were to arrive the day we left on vacation. They didn't arrive.

      When we got back from vacation, the molds were in the mailbox, along with a week's work of mail and an infestation of ants mixed in the mail. First sign of the ants is when my wife pulled the mail out and screamed and threw the mail across the lawn. After sorting through the mail and clearing the ants off it, I found the return letter from Frying Pan & Blanket Amalgamated. The letter informed me that they no longer take orders. As I had decided to use these figures for my War of 1812 project, I found myself back to square one with that project. When I entered the house my magazines had arrived. My stepson had stopped by the house and found the box and  brought them in. Unfortunately, that week we had drenching rains, and the box sat outside during them. When I opened the box, the rain had soaked through the box and the seller had just put them in the box with no wrapping on them. I had to use the spare room as a drying room for the magazines that were soaked through, hoping that the magazines wouldn't turn to paper mâché.

  I was somewhat disappointed with the cavalryman mold, as it showed on the illustration that among the different heads were dragoon heads. However, instead there are several heads with late 19th century caps and no dragoon helmets. Also to put the plug heads on, I need to drill holes in the body, a tricky proposition for me with my shaky hands. Still, it might be a helpful mold in my 40mm projects.

    One plus is I got a copy of the first war-game magazine I every owned. I bought it new at the local hobby store. Unfortunately, I lost the magazine during different moves. I am looking forward to reading it again.


Wet magazines in the "drying room". Luckily the pages didn't stick together and they all seem readable.


The copy of the first wargame magazine I ever owned. One of the main reasons I bought the lot.

One reason I loved this particular magazine were the maps drawn for the article on Quatre Bras. When I got bored in school (which was often) I would draw up battles using the little slash regiments as shown in the photo.

After looking at the magazine, I now think that maybe these maps are why I like my 2mm block armies.


The Airfix illustration of the cavalry figure, and the actual casting.

In this picture, I have drilled out the plug hole and attached 2 lancer heads. They should be useful figures.


Tuesday, February 19, 2019

And Now, a Successful Mold

       It's weird what I think of when I wake up in the middle of the night. This night I woke up thinking of SAE figures and how to use them for Little Wars. There is one line in my first copy of Little Wars: " His fire met my advance, littering the gentle grass slope with dead,..." and next to this line, one of J.R.  Sinclair's margin drawing of what looks like Boer War British infantry charging through a barrage of wooden shells that inspired my next mold. I have some SAE British Colonial infantry that are painted with the traditional red coats and with pith helmets. I decided to try to mold one of these figures that I could paint as Boer War infantry.

    Next day I went to work on the mold using the same procedure mentioned in the last post. Below is the result.
The master after pouring the first half of the mold.

Start of production.

Fresh out of the mold. At this point I would put the mold back together and pour another  casting. Then I cut the pour spout off and return it to the pot; file down the base, and trim any flashing off the figure. By this time the next figure can be removed from the mold.


Some of the casting next to the master.  

Sunday, February 17, 2019

Mold Making


I said recently that it might be time to do a post on my mold making. Here it is.

In the past, I decided that if figures I wanted can be bought, I would save myself the work of casting my own. With my recent work on SAE 30mm Civil War figures, my collection has no cavalry ready for use, although I have several that are broken off their bases. I went to the Spencer Smith website, but they didn't have the figure I really wanted for my project. Also, right now money is tight.  As I have the rubber to make my own mold and the figure I wanted, my plan was to try to join the two pieces as close together as possible and hopefully carve any rubber off to unite the two pieces.

The master placed in clay. Try to find the original mold lines and follow the same. The  keys are made by sticking a paintbrush into the clay and rotating it to make a cup shape. For the box, I used. two pieces of  "L" shaped metal for the box. As can be seen, it is easy enough to make the box larger or smaller. Some people use Legos to make the box.

Aeromarine 125 2 part RTV silicone rubber. It's easy to measure, as it's measured 1:1. 

I have learned to measure A first, then B. I use a tablespoon to measure it. Usually  I use 3 tablespoons of each  for molds. As this mold is larger than most, I upped it to 4 tablespoons.

Pouring the rubber into the mixing cup. The cup is easy enough to clean. Just wait for the rubber to set then peel out the dried rubber.

After getting the rubber measured out, then stir until it's a uniform color.

I usually drizzle in some of the rubber into the keys so as to stop air pockets  from forming.


I  drizzle the rubber over the figure,  then work the rubber around the figure. I  wait a couple minutes, letting air bubbles pop.

Then slowly pour in the rubber.

This rubber cures in 8 hours, which speeds up the mold making process. If there is rubber film where there shouldn't be, gently cut the rubber and remove the film.  I then cover the exposed rubber with petroleum  jelly. I use an old paintbrush to work the jelly in. This is the mold release. Then repeat the above process.

I would love to say it produced the figures as planned. However, I couldn't get the mold to work right, and so the mold isn't a success. I have decided to order the figures from Spencer Smith, even if they're not what I wanted.  I did make another mold, which was more successful. I will show more on that later.


After several attempts at making the mold work, I still was unable to. I wasn't going to show this, but the reality is not all molds work as you hope. 

Sunday, January 20, 2019

Back in the Saddle


       One of my brothers was kind enough to give me his "old" Mac computer (it's about 6 years old), allowing me to get back on line. A big thanks to my brother, Mike.

    I bought some new rubber and made a mold of one of my sculpts. I wanted to see if the green stuff would handle being pressed into the clay I use. The figure held up to the abuse, and I am happy with the end result. Unfortunately, I ran out of metal after 3 figures. Unlike in the past,   I ordered new metal instead of melting down old figures or using scrap metal. The new metal came in yesterday, however, right now I don't see myself casting anymore of the figures, as I don't think I will have use for them.

   Little else has been done with wargaming, except a few games and trying to get motivated on some project; so far little luck.


Finished casting of my original sculpt.


Figures painted as cavemen.

I added a spear to one of the figures.

Saturday, December 23, 2017

New Casting & a One Day Wonder Army

      This week I completed a mold I had started week before. When casting figures from this new mold, I decided to try to use a melting pot bought years ago. I had little success using it and put it aside, using a hot plate setup instead. As I have stopped using scrap metal, and knew the melting point of the metal, and after doing some research online about the Lee pot, I decided to give it another go.  It worked as I hoped it would, and got good usable figures. The pouring spout takes the trial of pouring consistently out of the equation.

    On Wednesday night I decided to make a mold using the Peter Laing marching Guard figures. As the rubber being used cures in 8 hours, the next morning when I got up, before going to work, I completed the mold. My plan was to try to do some casting after work, and the mold should be complete at that time.  It was also going to give me an idea if the pot would work well with 15mm molds. I am happy with the results. I believe the new pot keeps the temperature of the metal consistent, as the problem with the metal "crystalizing" didn't seem to happen.

   After casting the figures, they were brought up for trimming and basing. I completed 18 figures, enough for 4 infantry units and one artillery unit. So in a 24 hour period, the mold was completed, the figures were cast, cleaned and based. And all that in spare time on an average work day. I do believe if I had set aside a day, I could have in that 24 hour period, produced from making the mold to final painting, a complete army.


The melting pot back in use. I stopped using it when the pour spout blocked up and I couldn't get it cleared out. I believe debris and paint from the scrap metal being used got into it, along with metal that probably wasn't melted to the right temperature.

Three of me new figures for use in Backyard Wars.


My new One Day Wonder army. The cavalry figures and general are original Peter Laing figures.

The figures receiving their toy soldier paint jobs. As I was painting them, I realized that they were receiving the same uniform colors that some of my Airfix Guards figures were painted with. I had painted the Airfix figures that way, thinking they would look like Napoleon's Imperial Guard, that could be used with my Airfix French Napoleonic figures.
 I have decided that these figures will represent my old toy country, Shiak, in future games.

Sunday, December 3, 2017

First Homemade 54mm Toy Soldier Mold

     The Saturday after Thanksgiving was  glorious, with above average temperatures. It was one of those days where you feel guilty staying inside; doubly so if you own a dog.  While sitting outside, my mind started to wander to Backyard Wars, and why I never did much with it. I started thinking of my British Heralds troops and how to use them. In one of my earlier posting, several writers responded about using Little Wars or Funny Little Wars rules. At first I shot down these ideas, leaning towards using dice. However, I realized that this is just bringing an indoor game outside. However,  I started to rethink my objection. Perhaps I lost interest in the game because of using dice instead of toy guns.

    I also started thinking of the figures I was using. While I like the Herald figures, I was also thinking of using Britain's hollow cast. Among the few Britain's I have are some ACW figures. While I have tried to use standing figures outside, but because the rough terrain, they won't stand well. However, I brought the kneeling firing outside and found that this figure works quite well in the grass.

   I decided to  thy a mold of this figure. I must admit that I rushed this mold, and had my doubt about the mold working. I was pleasantly surprised that the figures turned out the way they did.

Painting my new casting.


Out in the field.


 With these figures, I am thinking of painting them with different uniforms used in the Civil War. I've also started working on some simple rules to use with these figures.