Showing posts with label Little Wars. Show all posts

Sunday, May 5, 2019

Two Wargames

       With the Great Northern Wars Armies nearing completion, I've been finding myself working on odd projects. I did do another wargame using the GNW figures. I wanted to try a couple of ideas from other games to work into my games. One was to limit the number of shots of the artillery, another was infantry units running out of ammunition. The limiting of artillery ammunition  seemed to work; the infantry running out of ammo not so much so.

      I also wanted to get another game in, so I used "The Battle of Hook's Farm" as the basis for the game, and broke out my Peter Laing "Little Wars" army and Boer War British. I used "See the Elephant" rules for this game.


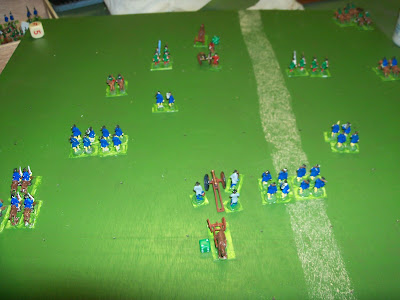
The GNW game in progress. I wasn't going to take photos or mention this game.  However, I did want to mention the rules on ammunition. The rules on the infantry running out of ammunition comes from One Hour Wargames Shotte & Pike rules. I liked how it played out in that game. However, in this game all save one Russian infantry units ran out of ammo early in the game, putting them at a disadvantage early in the game. I would like to work supplies into my games, if nothing else than to use my wagons for resupply.


In this photo, the Swedish artillery supply can be seen. They are down to two rounds. Fortunately, at this point the Swedes had won the battle, so there was no need to conserve ammo.

The battle at the end.


The Swedish cavalry in it's last move nearly drove the Russian cavalry off the field.

The battle of Hook's Farm. The Red army deployed most of their troops towards Firely Church ridge. The Khaki  army had to deploy first, and had spread their forces along the entire line. This gave the Red army the idea to try to turn the Khaki's right flank. In the middle right, by the trees, can be seen some redcoats. This unit was sent forward to harass the Khaki's left.

The Khaki army deploys their artillery on Hook's Hill, and another unit seizes the hovel in the hollow between the two hills.

The Guards grabs Firely Church.

Between the artillery and guards fire, the Khaki's lose 4 men.

The rightmost Guards unit push forward to hit the Khaki's right flank.  On the Red's left, the infantry moves forward to snipe at the Khaki's infantry on that side.

the Guards seize the hovel, and drives off the surviving  Khaki Highlander.

The Khaki's counterattack.


The Guards at the hovel loses two men. The other Guard unit is forced to retreat back to Firely Church.  The Reds Highlanders come up onto Firely Ridge. The Red infantry on the left lost two men and retreated back into the woods.

Another Red infantry unit is at the cottage at the base of Hook's Hill. Between the Red artillery and infantry fire, the Khaki artillery is forced to retreat. Meanwhile, the Khaki infantry loses two men to the Red infantry fire on the left.

At this point, the Red army has a strong force holding Firely Ridge and another fresh infantry unit at the cottage.Besides the Khaki cavalry, the Khaki army only have one infantry unit that hasn't been in the battle. To try to attack Firely ridge would be too costly. The Khaki commanders calls for a retreat.

Both games were enjoyable. I should have a clear idea which rules I'm using and any changes, even for one game, should be written down.

Tuesday, December 19, 2017

OHW Scenario 3 Wargame

Wanting to use the new Little Wars army, I rolled a 1o sided dice to pick  a scenario from Neil Thomas' One Hour Wargame. I rolled Scenario # 3: Control the River.


Red Army vs Blue. The Blue was moved forward one square after this picture was taken;  otherwise the Red army would have a clear advantage being only 3 squares to the bridge, as opposed to blue being 4 squares away.

Both armies send their cavalry to try to seize the bridges. The Blue army cavalry are armed with rifles. For this game I gave the Blue cavalry the range of two, rolling two dice, or engaging in close combat with two dice. The Red cavalry were lancers and dragoons; they are close combat troops and have to be adjacent and rolls three dice. The rules for the blue cavalry comes fromThe Stronghold Rebuilt "See the Elephant" rules.


The red cavalry wins the race for the bridges.

The red cavalry charge the blue cavalry and kills one blue cavalryman. Using  "See the Elephant" close combat rules, because the blue cavalry wasn't wiped out or forced to retreat, they get to "counterattack" with one dice, which forces the red cavalry to retreat.


The lancers have more success, killing one blue cavalryman and forces the others to retreat.

The blue Zouaves attack the lancers in the flank, killing two of them.

The blue cavalry continues to attack the red dragoons, killing one and making the others retreat.

The Highlanders in the woods to the left fire into the blue cavalry, who retreat across the bridge.

The blue cavalry charge across the bridge...

...and firing into the woods, kill one Highlander. The Zouaves push the surviving lancer back.

The Zouaves start across the bridge, with the cavalry distracting the bicycle machine gun unit.

A unit of Guards move to block the Zouaves advance.

The Highlanders kill another blue cavalryman, and the Guards push back the Zouaves.

The Zouaves counterattack and forces the Guards back two spaces.

The Red army brings up reinforcements on the left. Their fire kills the last blue cavalryman.  The machine gun kills one cavalryman, and forces the surviving cavalryman back. The rightmost Guards long range fire drives the Zouaves back.

Blue infantry advance, their firing kills one Guardsman and one Highlander.

The Red cavalry attacks and drives the blue infantry off the bridge.


The blue infantry counterattacks and kills one cavalryman and the last cavalryman retreats.

The Zouaves succeeds in driving the Guards back.


The Guards eliminates the Zouaves.


The blue cavalry crosses the left bridge, and drives the machine gun unit back. At the other bridge the blue infantry crosses the bridge again.

The blue infantry is hit from three sides and is driven back.

The Red's left launches an all out assault, while the machine gun unit kills the last blue cavalryman.

The Highlanders cross the bridge.

The blue army pushes the Highlanders back, while the last blue unit on their left starts across the bridge.

The Guards on the left storm over the bridge, and puts one blue unit to flight.


One blue unit on the right manages to kill two of the Guards, while the machine gun unit has one man killed and starts falling back.

The Guards kill the last infantryman in that unit. The blue army has lost 2/3 of their units, and must fall back.

It's not a clearcut victory for red, as the blue unit holds one bridge, but red still has 4 units on the field.

Saturday, December 16, 2017

The New Peter Laing "Little Wars" Army

       With the recent infusion of Peter Laing Victorian Parade Highlanders and Guards, I have come to the realization that I no longer really need to use my home cast infantry figures for my current wargames. I found that I can now form at least 3 Peter Laing Little War legions. Both the Guards and Highlanders will be able to muster 6 infantry units, with attached cavalry and artillery. Currently my "Regular Infantry" will consist of 2 infantry units and 1 sapper unit.  Thus, my home casts will be put into reserves.
    I do have several single Victorian Parade figures. Among them are a single Rifles Officer  and Rifles Bugler figure. I am thinking of using these figures the same way Sharpe is used in the Sharpe's series of books; having him take command of regulars for special missions.
4 Guards and 3 Highlander units, along with the Colonel of the Guards and bicycle unit.

The Colonel of the Highlanders receiving new paint.

1 unit of Guards, among with the 2 units of regulars and unit of sappers.

Sunday, December 10, 2017

Battle of Hook's Farm: Peter Laing Little Wars

The newly arrived Guards and Highlanders were quickly moved forward to the front. They were part of the Red Army that were ordered to seize the ridge that Hook's Farm was located.
The Battle of Hook's Farm: The Red army on the left, the Khaki Army on the right. Several of the hill squares are green and cannot be seen in the photos.

The Red Army. Both armies have 4 infantry, 1 cavalry, and 1 artillery units. Usually I roll for the armies composition; this time I just used equal forces.

The Khaki army. They have their cavalry in reserve off the board. 

The Guards move forward to seize Firely Church. The Khaki infantry have already reached Hook's farm.

The Guards try to flank the Khaki artillery, while the red artillery moves forward.

Khaki infantry move forward to bring the red artillery under fire, killing one and forcing the battery back.

Khaki infantry and artillery bring the Guards under fire, killing one and forcing the unit back, who takes up position in the church.

The Guards in the woods drive back the Khaki infantry (And moves into that space), and the red artillery fires on the Khaki infantry that fired on them, killing one.

The Khaki infantry counterattacks, and with artillery support, drives the marching Guards 3 spaces back. ( I started using the "See the Elephant" rule, where if a unit has to retreat and it's line of retreat is blocked by a friendly unit, it can move back to a square on either side of the blocking force.) The Guards retreated the wrong way; they retreated to the right of the church, putting them in the line of fire of the artillery. Meanwhile, the Khaki infantry bring the red artillery under fire and wipes it out.

The Guards in Firely Church charges out and drives back the Khaki infantry.  The other Guards move behind the church to get out of the artillery fire. A unit of Highlanders grab the cottage at the base of Hooks ridge, and kill two of the Khaki infantry.

The Khaki artillery kills two guards, and drives the survivor back to the church.  The Khaki infantry attacks the cottage to try to drive the Highlanders from their sniper perch.  Not seen in the photo, the red cavalry moves up trying to position themselves to attack the Khaki infantry.

A Khaki infantry unit moves forward to protect the rear of the Khaki infantry that are attacking  the cottage and kills one of the cavalrymen.

The Guards occupy Firely church and drive back the Khaki infantry. The second unit of Highland Infantry starts to move in support of the Highlanders in the cottage, and kills a Khaki infantryman. Meanwhile, the red cavalry kills two infantrymen.

The Highlanders in the cottage kills the last two infantrymen on the ridge. The other Highlanders kill one infantryman, and forces the other back. The red cavalry kills one infantryman, and drives the other back. The Khaki's attempt to clear the cottage has ended disastrously for them. Meanwhile, the Khaki cavalry is entering the field at the very top, in an attempt to flank the Red army.

The Khaki infantry in the woods snipe at the cavalry and kills one man.

The Guards charge out of Firely church, at the same time the Highlanders in the cottage charge up Hooks Ridge and the crossfire drives the Khaki artillery back.

The Khaki infantryman in Hook's farm moves behind the bushes to engage the Highlanders, and kills one.

The Khaki marksman behind the bushes kills the Highland officer. The Khaki infantry  attacks the Guards, without success.

A lone Guardsman brings the Khaki cavalry under fire, killing one.

The Guards counterattack, and drives the Khaki infantry off the hill.

The Highlanders advancing on Hook's farm takes the time to kill the last Khaki infantryman on the Khaki left.

The Khaki cavalry finally kills the pesky Guardsman who held them up. The Khaki artillery and infantry attack the other Guard unit, killing one and driving the others back.

The lone Khaki infantryman that dispatched the first Highlander unit, now moves back into Hook's farm and his sniper fire drives back the Highlanders. 

The Guards attack the Khaki cavalry, killing one and making the last cavalryman  retreat. This move also  got the Guardsmen away from the deadly artillery fire.

The Highlanders finally clear Hook's farm of the lone Khaki sniper. The lone red cavalryman can be seen galloping  by the cottage, moving to support the left.

The Khaki infantryman, supported by the artillery, kills two of the Highlanders. Meanwhile, the Khaki infantry move forward to bring the Guards under fire from two sides. 

The Red cavalry launches a charge against the Khaki artillery, and kills one gunner.

The Khaki artillery kills the last cavalryman. The Red Army has lost 2/3 of their army, and must now retreat.

The Red general moves forward to meet his dispirited troops.

The battle was a near run thing. Once again, the army holding the strong defensive position  left that position and almost lost the battle. At the time I though the Khaki army could roll up the Red army's right flank.

While walking my dog before this battle, I started to get some ideas on how to use my new Peter Laings. I hope to have a posting soon about it.